|
I am writing this page for in English with Google translator. Click the Danish version and see the original Danish website.
This English page is suitable for PC - Tablet - Mobile phone. |
|
|
How to spool new line on a spinning reel
Spinning Reels Put your new coil on the floor with the label facing up. Pull the line through the lower eye of the rod and tie the linen on the reel. Spool the linen on the reel with 10 revolutions of the handle. Look for the line twisting. If the line twist turn the coil with the label facing downwards. Fill the reel with the line until there is approx. 1 mm from coil edge. Wear gloves on the hand that holds back on line. Is required if you spool Fireline. How to spool new line on a spinning reel with Power Roller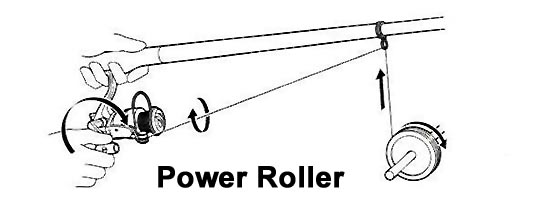
Power Roller Some expensive spinning reels have Power Roller to reduce the twist of the line with up to 50%. Therefore, these spinning reels with Power Roller work best if the line spool on after this recipe. Insert a suitable screwdriver through the coil center. Attach the screwdriver or better get a fish friend to hold the coil while you spool the line. Exert appropriate pressure on the sides of the coil, so the line does not spooled too loose nor too tightly. Fill the reel with the line until there is approx. 1 mm from coil edge. Wear gloves so as not to burn your hands. How to spool new line on a baitcasting reel
Baitcasting Reels Insert a pencil into the center of the spool and have a fishing buddy or your good wife hold the spool. Pass the line through the lower eye of the fishing rod and tie the line to the reel. Wind the line onto the reel while exerting light pressure on the sides of the spool so that the line does not become too loose on the spool. Fill the spool with line until there is approx. 1 mm from the coil edge. Use gloved hands to press against the sides of the spool. If you wind the Fireline and let the line run through your fingers, gloves are also required. Back to the page where you came from. |
This knot is ideal for a "Shaft knot" with nylon line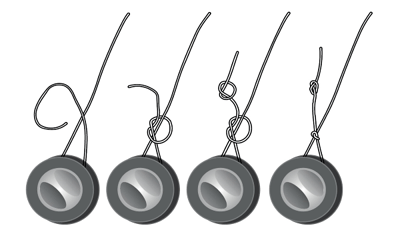
Arbor Knot for Nylonline For nylonline Arbor Knot1. Pass the line around the spool shaft and tie a single knot around the main line.2. Tie a single knot around the loose end and tighten both knots lightly. 3. The linen must be made wet. Mouthwash is good. The main line is then tightened so that the knot on the loose end reaches all the way down to the first knot. Cut off the thread 5 mm above the knot. This knot is suitable for coil shaft knot with Fireline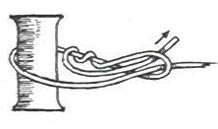
Arbor Knot for Fireline For Fireline1. Pass the line around the spool shaft and pull the swain under the main line.2. Lead the line over the main line and back in its own direction. Twist the string at least twice around its own line. Bring the guy back and insert it into the loop where the main line goes through. 3. The line must be made wet if nylon line is used. Mouthwash is good. Then the main line and the fishing line are tightened together so that the knot lies neatly on the spool. Cut off the thread 5 mm above the knot. This knot is ideal for spinner, spoon, pirk, jig and wobler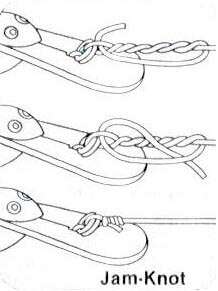
Single knot with nylon line Jam Knot: Single knot with nylon line1. Thread the eye of the bait you want to use and twist the tag and main line together 4 to 6 times.2. Complete the twists and thread the tag back through the loop formed by the first twist. 3. To lock the knot, thread the tag through the open loop which has been formed at the top of the knot. 4. The line must be wet when using nylon line. Saliva is good. 5. Pull the knot up firmly and the result should be as above. Should a loop form within the knot, simply pull on the tag until it disappears. Cut tag of 5 mm above the knot. This knot is ideal for spinner, spoon, pirk, jig and wobler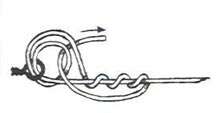
Double knot with nylon line Double knot with nylon line1. Thread the eye of the bait you want to use and twist the tag and main line together 3 to 6 times.2. Complete the twists and thread the tag back through the double loop formed by the first twist. 3. The line must be wet when using nylon line. Saliva is good. 4. Pull first the tag and then the main line. Cut tag of 5 mm above the knot. This knot is ideal to join two nylon lines of similar size together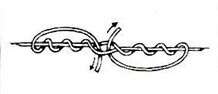
Blood Knot with nylon line Blood Knot with nylon line1. Take 2 nylon lines with a maximum 0.05 mm diameter spring and put them together with an overlap of approx. 20 cm.2. Take left tag and twist it 3 times clockwise on the left main line. 3. Take right tag and twist it 3 times anticlockwise on the right main line. 4. Thread the left tag back through the loop in the middle. 5. Thread the right tag back through the loop in the middle. 6. It must be made from different directions. 7. Now the line must be wet. Saliva is good. Tighten gently up into the two main lines. Beware of the two tags don't fall out. Cut tag of just above the knot. This loop is used for a suspended fly or rubber tails
Suspended loop with nylon line 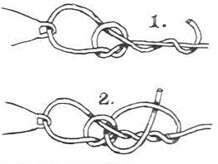
Rapala knot for wobler 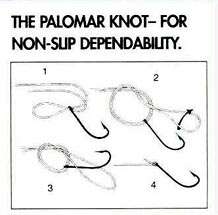
The palomar knot for Fireline Back to the page where you came from. |
Mounting the fly reel with backing line, fly line, tapered leader, tippet and fly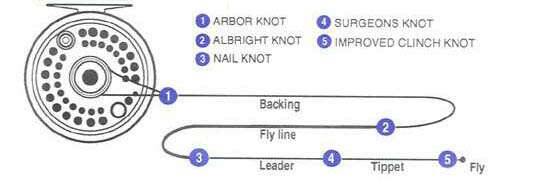
Basic assembly overview "Arbor Knot" On the fly reel, spool first a backing line with a breaking strength of 20 lbs or 30 lbs. An appropriate length can be between 75 m and 150 m. "Arbor Knot" is used to tie the backing line firmly on the reel shaft, hence the name "Aksel Knude". "Albright Knot" The next step is to tie fly line on backing line. Start by rolling 1 meter fly line of the spool, which fly line came on, remember it must be this end, which is labeled "this end to reel". "Albright Knot" is used to tie the fly line on backing line. Fly line is now spooled on the reel, and here will a fish friend be helpful holding the fly line. A pencil inserted through the hole in the spool. Spool the fly line on the reel while exercised a little pressure on the spool sides. "Nail Knot" We have now come to the tapered leader to be tied on the fly line with a "Nail Knot." The name comes from that we must use a needle with a diameter slightly larger than the fly line. A small tube where the tapered leader can go through, are also suitable. That is what is shown in the picture. "Surgeons Knot" We must now tie a tippet on the tapered leader. There are several reasons to use a tippet. I will mention just one. Switching often flies, you will soon have spent your tapered leader to 30.00 DKK. The thickness of the tippet you need should be 0.05 mm smaller than the thin end of the tapered leader. "Improved Clinch Knot" The last knot you will tie on your fly tackle is an "Improved Clinch Knot". This knot attaches probably your fly to the tippet. There is also another knot "Turtle Knot", but I lack a picture. Arbor Knot 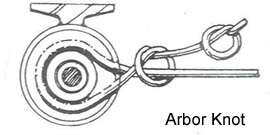
Arbor Knot This knot is shown above, but appears again for integrity reasons. Arbor Knot means shaft knot and tied as shown here in the picture. Spool now backing line, but remember it must be in the right direction. Backing line must go out from the bottom of the fly reel. Read binding text here. Albright Knot 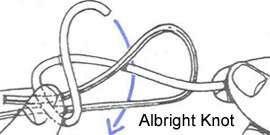 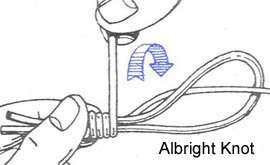
Albright Knot The next four pictures show you how to tie fly line on backing line with Albright Knot. Start by forming a loop in the end of the fly line. Bend the end approx. 5 cm back on fly line. Hold the loop between left thumb and forefinger. Insert from right approx. 25 cm backing line in to the loop. While you still hold with the left hand on the loop, you clamps down the backing line between left thumb and forefinger. Use right hand to twist the tag on loops and backing line. Start at your finger and twist from 10 to 12 laps toward the end of the loop. The windings must be close and quite tight. So far so good. Now comes the hard. Albright Knot 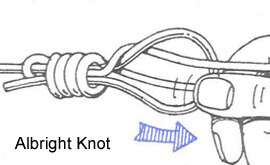 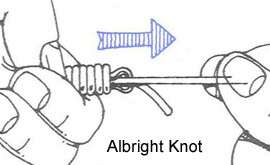
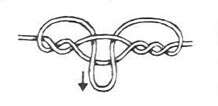
Albright Knot Now you need to put the tag of the backing line through the loop on the opposite side as it entered. This means that both backing lines - the main line and the tag - coming out through the loop on the same side. Wet the lines. Pull the main backing line until the looped, which you held in your left hand, disappears. Pull in both backing lines so they tightened up. Pull carefully both ends of fly line with your left hand. Press with your right hand the knot against the fly line loop end, but not above this. Hold fly line (both ends) in the left hand and backing line (both ends) on the right hand. Pull now as tightly as possible, so you form a nice knot. Cut both tags of near the Albright Knot. Now you're ready to spool the fly line on the reel. Remember a fish friend can be helpful. Nail Knot 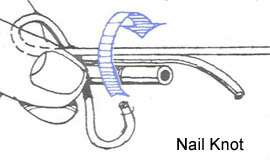 
Nail Knot You use a "Nail Knot" to tied your tapered leader on the fly line. This knot can also be used to tie the fly line on the backing line. You must use an appropriate needle or a small tube to do this knot. Hold the needle/tube and the end of the fly line between the left thumb and forefinger, so that sticks approx. 5 cm line fly out to right with the needle/tube. With the right hand produced a 30 cm loop on the thick end of the tapered leader. Press the loop down between the left thumb and forefinger beside the fly line and the needle/tube. Use right hand to make 5 turns tightly around fly line and the needle/tube with the tag of tapered leader. Windings must lie close at each other and be at least 2 cm from the end of the fly line. Nail Knot 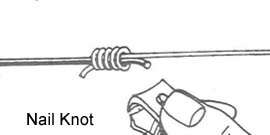 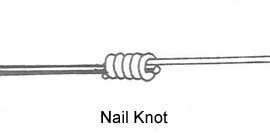
Nail Knot Slip the left thumb and forefinger over the windings so they are not getting loose, while you are with the right hand leading the tag of the tapered leader through the needles eye or hole in the pipe. Pull now the needle or pipe toward the left, then tag comes truly through the windings. FIRST tighten up a bit by pulling at both ends of tapered leader - not the fly line. Look for the windings, trim if necessary. Moisture the knot, and now tight up by pulling simultaneously at both ends of tapered leader so much that the line just "bite" on the fly line. Warning, if you have a lot of muscle power, you can cut the fly line. You tighten now tapered leader and fly line by pulling these two lines as these two "sets" themselves. Finally trim your tapered leader and fly line by cutting the tags of 1 mm from the knot. Surgeon's Knot 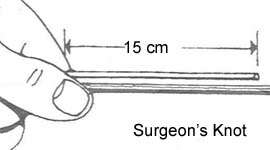 
Surgeon's Knot The easiest way to tie the tippet on the tapered leader is with a "Surgeon's Knot". Place the tapered leader and the tippet side by side of each other approx. 15 cm in length, each with its end in the opposite direction. Squeeze on the tapered leader and the tippet with the left thumb and forefinger. Use right hand to make a loop and thread the tag of the tapered leader and the whole tippet through the loop. Surgeon's Knot 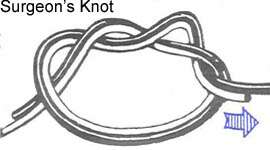 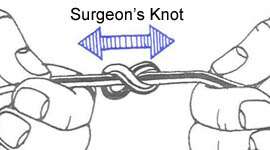
Surgeon's Knot The knot must be made stronger. Then repeat the following: Thread the tag of the tapered leader and the whole tippet through the loop a second time. Look for the tapered leader and the tippet are not turns around each other. It will weaken the knot. Moisture the knot before you pull it tight. Pull simultaneously in all four lines: the left side tapered leader and tag of tippet, right side tippet and tag of tapered leader. Cut the tags close to the knot. Improved Clinch Knot 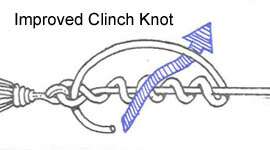 
Improved Clinch Knot Take the fly between left thumb and forefinger. Thread 15 cm of tippet through hook eye. Make five turns along the line. Take the tag back over the turns and thread it through the opening between the hook eye and the first turn. An open loop has been formed over the turns. Thread the tag through this loop. Tighten now the knot by pulling the tag. Look after the turns are stretched neatly side by side. Trim if necessary. Moisture the knot before tightening up, then the knot lies close to the hook eye. Cut the tag 1 mm from the hook eye. Other useful fly knots and loop to loopMajor knot 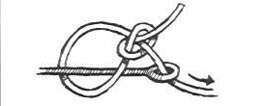
Major knot This knot is the simplest to tie a fly on a tippet. Thread the tippet through the eye. Once around the hook sharft. Tie a knot around the line. Tighten up and cut of. Major knot or Turle knot are the same knot named after Major W. G. Turle, England. Eight-node knot 
Eight-node knot Do you have a ready-made tippet with a loop and will tie a line in, you can benefit from tying an eight-node knot. Thread the tippet through the loop and make a figure 8 as shown. Tighten up and cut of. Duncan fly knot 
Duncan fly knot This knot is ideal for tying a fly on hookline. Fly sits loosely in the loop and therefore gives a lively movement that causes the fish to hook. Two ways to tie a "Tip" on its "Braided Leader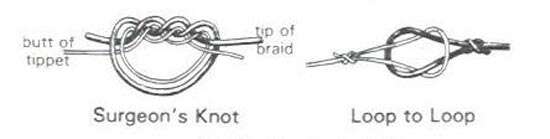
Surgeon knot and loop to loop Take your Braided Leader in the left hand and your tippet in the right hand. Let these two overlap each other by approx. 20 cm. Make now a loop with the size of a "falling". Thread the tag af the braided leader and and the long end of tippet twice through the loop. Tightened up with the loop in the mouth. Remember saliva is good. Do you have a loop at the tippet (you buy often a tippet with a loop), you can usefully use the "Loop to Loop" method. This makes it easy to change the tippet size. If you wish to make a "Loop" see the next example. How do you do a loop on your tippet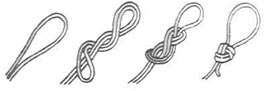
Loop to loop Make a loop as shown. Twist the loop twice around itself down the line and thread the loop from behind in the new formed eye. Tightened up. Remember it with saliva. Cut the tag of 5 mm above the knot. Grinner Knot How to make a Grinner Knot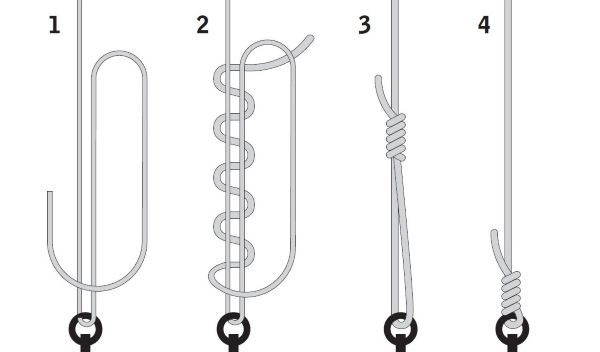
Grinner Knot for nylon line The grinner knot is very suitable for nylon line. This is how it is tied: 1. Put the line through the eye once or twice and form a loop with the thread. 2. Pass the yarn 4 to 6 times through this loop. 3. Tighten up carefully. Remember the mouthwash. 4. Tighten the knot tightly so that it locks, and cut the thread 5 mm above the knot. Watch the new videos of the best fishing knots and how to tie them: You Tube Back to the page where you came from. |
This is how you make your own spinners for DKK 15.00 per piece. When purchasing material for a minimum of 100 spinners
Wirestick Version No. 1 & Version No. 2 Form a "B" Loop as shown in the drawings below. Wire forming instructions only in English: Version No. 1 and Version No. 2 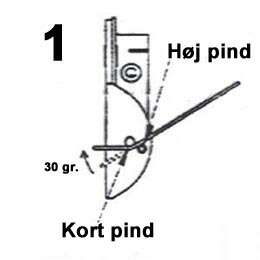
"B" Loop No. 1 Place the wire between the short and tall pins on the tool with the short end of the wire down. Short pin on the tool is held to the left. The short end of the wire should be 14 to 18 mm from the two pins, which corresponds to the length of the body with the bottom bead. Bend the short end 30 degrees clockwise. If you are making the shrimp hook, the short end of the wire is 25 mm down. See here . 
"B" Loop No. 2 Bend long end around tall pin in clockwise manner until it stops at short pin. Wire will spring back slightly. 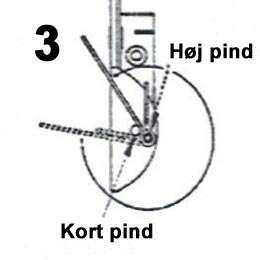
"B" Loop No. 3 Hold the wire in place around the tall pin and swing the long wire end back - counter-clockwise - until it hits the short pin. Put light pressure on the long wire end so that there is a slight bend on the wire, similar to the bend from before on the short wire end. 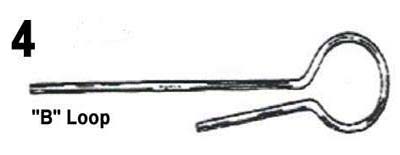
"B" Loop No. 4 The finished "B" Loop that you have made should ideally look like the one shown here. You can mount a small jump ring in this "B" Loop, so the hook can be changed very easily. I don't do it, because I think it affects the good movement of the spinner in the water. Note: In some purchased spinner sets, this loop is already made. If you buy the wire by the metre, you first cut the wire into lengths of 120 mm to 150 mm. Depending on the length of your spinner. Inline spinner and Outline spinner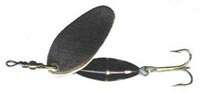 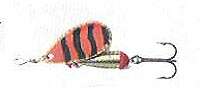
Spinner type In - Line: There is no spin clevis for the spinner blades. Spinner type Out - Line: There is a spin clevis for the spinner blades. 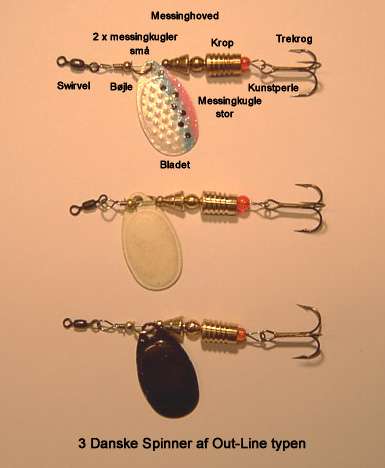
The Danish Spinner News: I have started to insert a small swivel in the "A" eye, so the spinner moves better in the water when spinning in slowly and the line doesn't wrinkle so much either. Try it yourself and see how good it is. Before you proceed, do the followingInsert a hook to match the size of the spinner in this "Loop". Or a small split ring.Insert over the two wire ends a colored round plastic bead that holds the two ends together. Insert the brass body over the two ends. Your brass body gives throw weight to the spinner. Insert a large brass ball. Insert a brass head. Brass ball and brass head helps to keep the spinner blade from the body. Insert a small brass ball. Insert spin clevis for the blade with the blade mounted in the spin clevis. Remember to insert the blade correctly. Insert a small brass ball. Now you're on track to make an "A" loop. Insert a swivel in "A" loop when this is done. Make an "A" loop as shown belowStainless steel wire can be purchased here:Frederiksberg Fjederfabrik A/S Nyholms Alle 43 2610 Rřdovre Phone +45 36 70 14 68 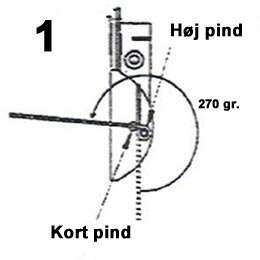
Wirestik No. 1 Place the wire between the two pins so that the spinning body faces up. Distance between short pin and bracket for the blade approx. 8 - 10 mm. Bend the free end around the tall pin 270 degrees counter-clockwise to form an eye. Bend the wire with the body counter-clockwise around the short pin, approx. 30 degrees. 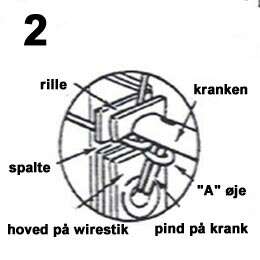
Wirestik No. 2 Remove the spinner from the tool. Taking the tool in the right hand, insert the wire into the slot as shown in figure 2 with the body to the left of the slot. Take the tool in your left hand, catch the eye with the pin on the crank and turn clockwise so that the free end of the wire slides into the groove. 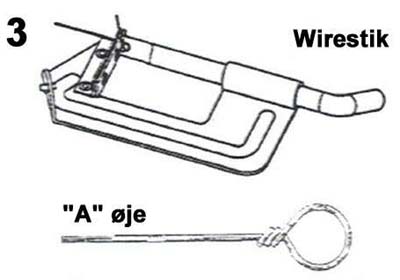
Go to a printable transcript of the instructions. Click Print. With short end engaged in the groove, push the crank toward the head and gently turn the handle clockwise 3 to 5 turns at a time. Continue turning the crank until the short end of the wire is completely wrapped around the shaft. You will hear a "click" when this happens. Note: Do not turn over so that the hanger presses on the wire connector head, because then the wire will jump. WARNING: When you cut the wire, hold the "tag" because it will snap far away and can damage your eyes and the eyes of others. Also wear glasses. Also remember iodine and plasters. Back to the page where you came from. |
Latest news: Condom spinners with replaceable spinner blades and hooks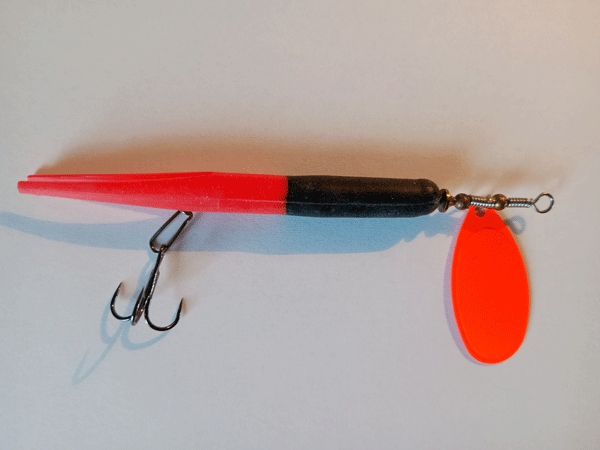 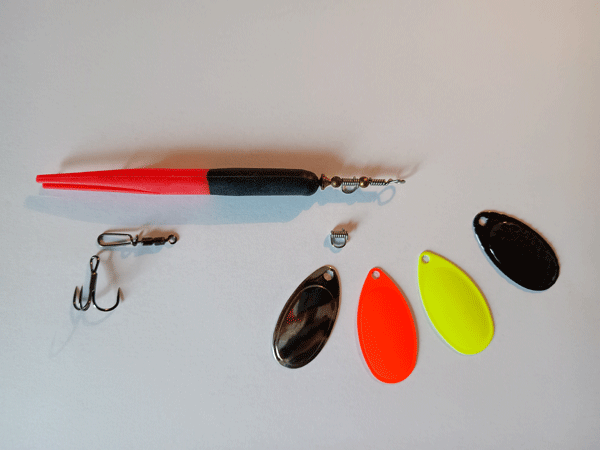
There are two major benefits to using these hangers and hooks. When I make condom spinners, I use the new hangers and the new hooks with swivels. They are slightly more expensive than the regular hangers and hooks, but they can of course be reused if you don't lose them. The new hangers: You can easily replace the spinner blade with another that is larger or smaller or in a different color. The hangers are called "Clip n' Spin Clevis" and are available in 2 sizes #1 - 4.7 x 4.6mm & #2 - 6.15 x 6.1mm. I have both sizes, but only the large one works for me. I find the small size too cumbersome to use. I can't change leaves by the stream with my fingers, have to use pliers to help and then the idea of the hangers are gone with the wind. The new hooks with swivels: The hook is easily changed with another hook and it is smart for those of us who sometimes must fishing with barbless hooks. The hooks are called "Sinker Hook w. Crane Swirvel" and are available in several sizes. Make OWNER model 52459. I use size #12 - #14 - #16. For Varde Ĺ, #14 and #16 suit best - light (12g) to medium (20g) heavy spinners. #12 for heavy (24g +) heavy spinners for powerful rivers in Sweden and Norway. The condom spinner shown here is with blade #4 and hook without barbs #8 weighs 16 grams and is suitable for Varde Ĺ at normal water level. Spinner blades all in size No. 3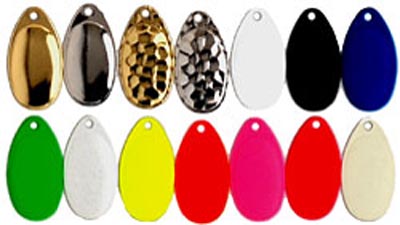
The top row shows the following colours: Brass, Nickel, Hammered Brass, Hammered Nickel, White, Black and Blue. The following colors are shown in the bottom row: Green, Mother of Pearl, Fluo Yellow, Fluo Orange, Hot Pink, Fluo Red and Luminous The size of blade no. 3 is 31mm and total weight of the 3 spinners as shown above is 7g. Above you see a selection of the spinner blades that we use in Stensĺn and other similar streams of the same size. Mostly we use size no. 3 in the colors Brass, Nickel, Fluo Orange, Fluo Yellow, Green, Mother of Pearl and Self-luminous. If you want to import these spinners yourself from the USA, you can order them online at the address: Lure Parts Online. If you are looking for Wirestik on the web, search for "Wire Forming Tools for lure making". Many types come up, ranging from DKK 100.00 to DKK 4,000.00 or more. Anti-Kink Vanes: Even if I insert a swivel in the homemade spinners, the possibility of line kink is present. By inserting a sheet of celluloid, as shown in the picture below, the line kink is almost 100% eliminated. It is best to make three holes through which the line is drawn. 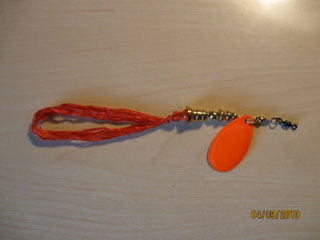 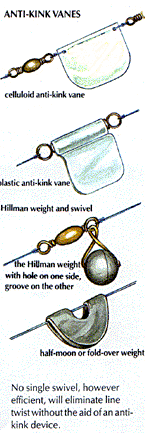 
Spinner with silk threads Anti-kink vanes for spinner Three spinners with a swivel Another option is to bend a piece of plastic or thin tin around a swivel. Third option is to insert a split lead solder into the swirl. Fourth option is to bend a piece of tin around the line. I have only tested the first option so far and it works as intended. In water with a lot of vegetation/seaweed/leaves, none of the options is suitable, as it helps collect more dirt in front of the spinner. Click here on Jigspinner to see a larger selection of these.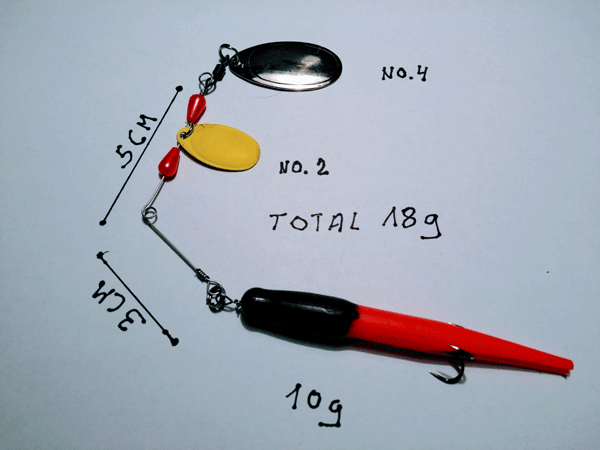
The prototype of my 18 g jig spinner Without a hook: Here is a novelty to be tested with a homemade spinner. We are going to Stensĺn in the spring of 2010, where there are many descenders, and we want to see if they will get stuck in the silk line. If it works as well as it does for garfish, it's a great way to catch fish. The fish can be gently released again and no damage has been done to the mouthpiece. So the question is simply, are the shiny fish firmly attached to the silk cord? The result will be here on the page when we get home. Then the spinner with the silk cord was tested in Stensĺn, and the result was not as expected. The trout did not get stuck in the silk line, I got many bites, but they all fell off before they came ashore. However, I didn't lose any spinners in the river's tree roots, but what's the point when I didn't get any fish either. Jigspinner: The picture above shows a prototype of a Jigspinner. It is equipped with a 3-hook without barbs, as it must be tested in one of the West Jutland salmon rivers. It is not fished in quite the same way as a "real" jig spinner, as this does not have a movable joint between the wire and the jig head. My prototype is fished like a spinner, but with the aim of creating more noise and turbulence in the water to attract the fish. (Salmon and trout). Home-made spinner: The picture on the right shows the new spinners in sizes no. 4 (12 g) and no. 5 (14 g), which are to be tested in Varde Ĺ. The spinner on the left was bought for DKK 40.00 and is size no. 4 (14 g). The spinner in the middle is home-made no. 4 (12 g) price DKK 15.00. The spinner on the right is home-made no. 5 (14 g) for DKK 15.00. However, excl. inserted swivel. Back to the page where you came from. |
Here's how to make your own shrimp hook for less than Ł 1.00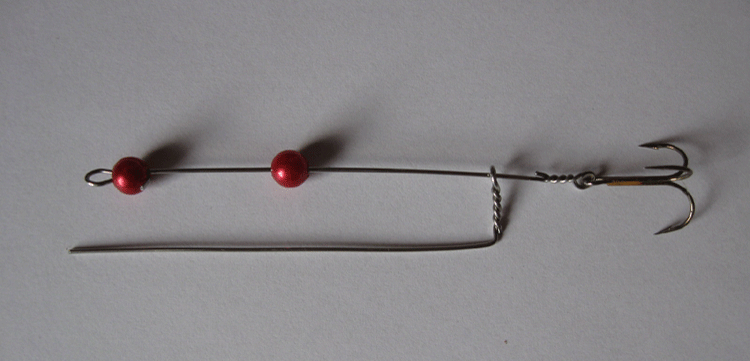
A picture of the original Langĺ Shrimp Hook 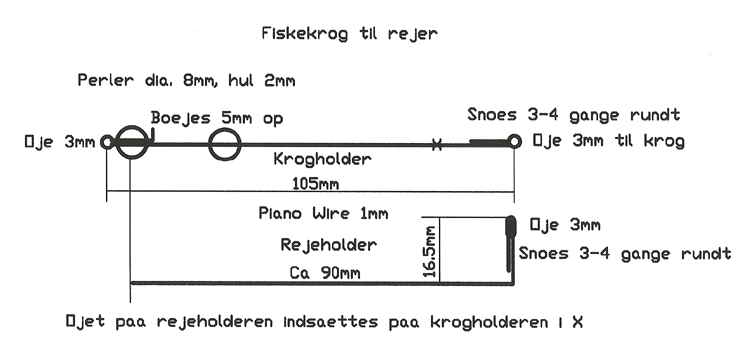
My drawing of the original Langĺ Shrimp Hook I went on a trip to Gudenĺen to try my luck for salmon with prawns. It is very annoying to fish with shrimp because they keep falling off the hook. So when I saw a ready-made rig for shrimp - Langĺ Shrimp DKK 43.00 - I naturally had to make one myself. I had my spinner set with me, so it was easy to spin one myself. Above is a drawing with measurements, so you can try it yourself. The pictures below show how I made 3 shrimp hooks. 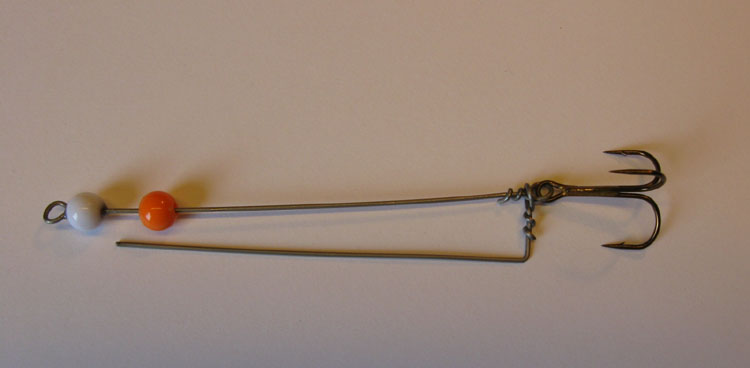
Pictures of my homemade shrimp hook No Liability Procedure: Use 0.8mm or 1.0mm acid proof stainless steel wire. 1.0mm wire is very difficult to bend and twist with the tool above. Cut two wires to the following measurements: Hook holder 160 mm and shrimp holder 130 mm. The first eye is bent on the hook holder according to the text in figure 1 above. The long end of the thread up and 25 mm down. The eye is made according to the text in figures 2 and 3. With the selected 25 mm down, you can turn approx. 3 times before it says "click", and thus there will be no clipping. A ř 8 mm bead (white) with a 3 mm hole is inserted over the twist and fixed with lightning epoxy. You can also choose to make it like on the original shrimp hook. Here, the "tjavsen" is bent tightly around the bead approx. 5 mm up. Excess wire is cut off. WARNING: When you cut the wire, you MUST hold the "bump" because it will snap far away and can damage your eyes and the eyes of others. Also remember iodine and plasters. This solution is bad, if the pearl bursts with the pull of a 20 kg salmon, the eye will straighten out and then goodbye salmon. That was the hook holder, and it is saved for later use. Now make the eye on the shrimp holder in the same way as above. With 25 mm wire down, there will be no clipping when the "tjavsen" is twisted 3 times around the main wire. Bend the wire 90 degrees so that the length is 16 mm. See the picture so the direction is correct. Fit the hook holder with a ř 8 mm bead (orange) with a 2 mm hole and insert the shrimp holder as shown in the picture. Adjust the holes in the beads according to the wire diameter used. At the end of the hook, make an eye as described above with 25 mm wire down. Then the total length will be approx. 105 mm, which is suitable for the large (huge) shell prawns. A good salmon hook is placed in the eye and the "tjavsen" is twisted 3 times around the main wire until you hear a "click". You can of course change the length so that the smaller prawns also fit the prawn hook. It is recommended to use 1.0 mm wire, for 105 mm and 0.8 mm wire if the length will be much shorter. The shrimp holder is now adapted in length to the hook holder. The shrimp holder is pushed all the way back towards the hook and the front end is cut so that it reaches the first bead (white). It is very important that the pointed end is filed round, otherwise you will stab yourself when using the shrimp hook. On the Internet you can buy a special wire cutter that does not pinch the wire flat. The wire is now inserted through the shrimp from tail to head and the end is inserted into the orange bead. I bought the beads from Nordicbeads 8 mm round acrylic beads item no. 221122. The wire at Frederiksberg Fjederfabrik A/S. The eyes and twisting of wire take place in the same way as described opposite under "This is how you make your own spinners." 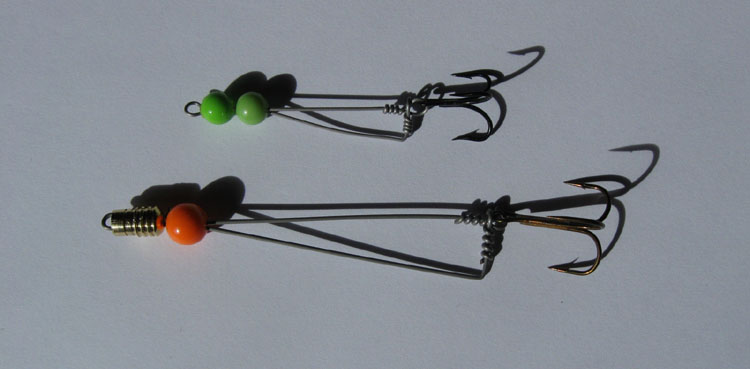
Two shrimp hooks 6 cm and 9 cm A note on fishing with prawns: Remember that not all streams are allowed to fish with prawns in. I only know two streams where I have been fishing myself, the Gudenĺen and the Ätran in Sweden. The large hook with spinner body above is suitable for fishing from the shrimp bridge (Laxbroen) in Ätran. Here it is not allowed to cast from the bridge - underhand casts are used - therefore the extra casting weight is good in the shallow current-carrying water. Fly fisherman can convert grains to grams and grams to grains hereConversion between grains and grams 
Good fishing gear for salmon and sea trout in Stensĺn Back to the page where you came from. |
How to make a solid casting tat for inshore fishing with earthwormsTake 2 meters of Chinese thread and thread it onto a needle. Use 6 large earthworms - 8 smaller ones - insert the needle into the earthworm 2 cm from the head end and pass the needle through the earthworm and out 2 cm from the back end. There are thus 2 worms per worm, which can move and attract the fish. Do the same with the rest of the earthworms. Make a ring by wrapping the earthworms around 3 to 4 fingers of your hand. There must be 2 loops of at least 30 cm at each end of the Chinese thread. The explanation comes later. Take a new Chinese thread of 1 meter and pass it through the worm ring a few times, where the two loops from before are, tie a few knots. Now thread your fishing line onto the needle from before, insert it where the knots are. The fish hook is now tied on the fishing line and the hook is pulled into the center of the worm ring. The two threads from before are inserted through the eye of the hook, from opposite sides, and then tied around the worm ring. Back to the page where you came from. |

one.com |