|
I am writing this page for Mobile Phone in English with Google translator. Click the Danish version and see the original Danish website.
This Cheese page is suitable for mobile phones |
|
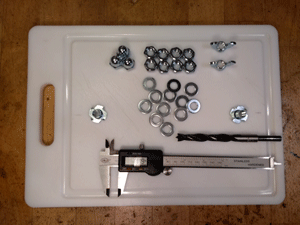
Hello and welcome to the cheese side! I have made Rygeost for many years, but not "real" cheeses, which ripen over a long time. I have followed some cheese nerds on the net and seen how to make cheese. There are not many remedies to make a Cheddar cheese. I especially noticed that the temperature should be kept at 32°C (90°F) for a long time when the milk was to coagulate. Then I was just thinking about my Sous Vide device. The other two remedies I had to do myself. A list of materials is found above. |
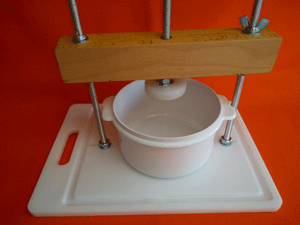
Photo no. 5 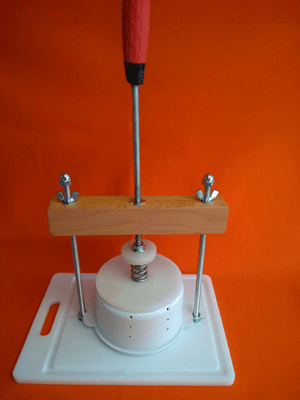
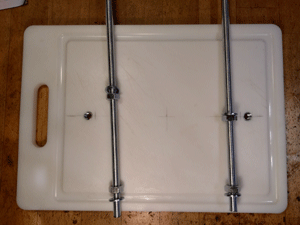
The finished cheese press is seen here fitted and the picture below My Sous Vide device |
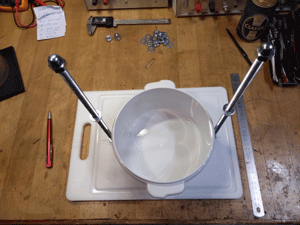
The distance between the holes (ø11mm) in the cutting board is 210 mm. An impact nut M10 mm is struck in each hole on the back. Note the 8 pointed pins are drilled with a 2 mm drill. The threaded rod (GS) is sawn 2x300 mm and the remainder 400 mm is seen in the middle with the red handle. The cutting surfaces of the GS are sanded so that the nuts can be screwed on and off with the fingers. The 2 GS of 300 mm each is screwed on with one nut and one washer and screwed into the impact nuts on the bottom. Tension is applied so that they are stuck. A 280x50x40 crossbar made of hardwood - I used beech from a doorstep (20 mm thick). Then 2 pieces were glued together. Tannannet, 3 holes ø 11 mm drilled, plastered and 2 times ship's varnish. Two impact nuts M10 mm are struck in the center hole. Note the 8 pointed pins are drilled with a 2 mm drill. A note on the top impact nut: This is drilled with an ø 10 mm drill so that the thread is drilled away because you cannot be sure to screw GS through two nuts.
Pressure breeds back pressure, so therefore the impact nut with thread is on the underside. Assembly of the parts should appear in picture no. 5. |
||
|
The threaded rod GS with the red handle is described here. Remove the handle from the groove spoon by attaching the groove spoon to a vice (clamp), and rotating the red handle around with a pipe wrench. You have to use forces to turn it around, but it is possible. Now knock out the handle with a hammer by attaching a wooden block to the bottom black piece. The hole in the handle is drilled with a ø 10 mm drill. Do not drill through the black piece at the top. A 2-component glue is filled into the hole and GS is screwed in as long as possible. Let it harden for 24 hours. I have made two bottom discs with cup bores ø 51 mm and ø 64 mm. It gives a finished measure of ø 46 mm and ø 59 mm. I use ø 59 mm only.
|
||||
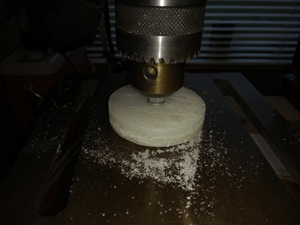 The disc is mounted in the column drill so that the edge can be sanded well for burrs. My disc is glued together by 2 discs of 6 mm. I use a 2-component adhesive. If you have a 12 mm cutting board, use it.
|
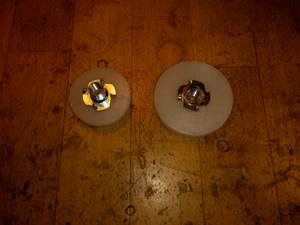 The two discs are cut and drilled an 11 mm hole for insertion of the impact nuts. I only use the large disc ø 59 mm. The small disc has too small a diameter for the spring used.
|
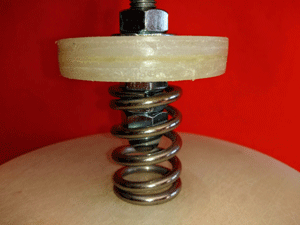 The disc is screwed to the GS with a nut and washer at the top. At the bottom, there are inserted 2 bolts and a cap nut. It gives the correct height for Ln of 33.1 mm.
|
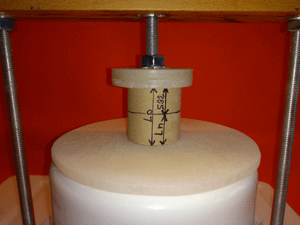 The height of the number of discs and top nut is adapted to the weight of 32 kg or 314 N, which the spring presses at most. In my Excel spreadsheet, the height Ln is 33.1 mm.
|
|
On the picture no. 9 shows a cardboard tube, which is intended to symbolize the spring with stock no. 23580. The tube length L0 = 41 mm is the length of the spring in unloaded condition. S32 = 7.9 mm is the travel at a load of 32 kg, Ln = 33.1 mm is the length of the spring at this load. If you need other springs, you can use my Excel spreadsheet for new calculations.
When calculating springs, do not use max. force Fn for the spring. The spring will then be fully compressed and therefore cannot return to idle state L0. The spring loses its properties and is therefore useless. Only use up to 70% utilization of Fn. The spring used here is utilized 56%. |
Photo no. 10 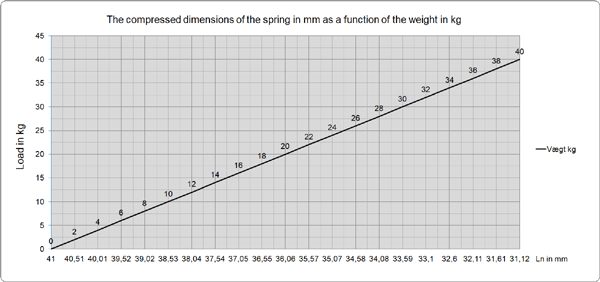
Spring compressed dimensions as a function of weight Weight as a function of revolutions Excel spreadsheet |
I use a threaded rod M10, it has a metric thread with an increase in mm of 1.5. This means that GS travels 1.5 mm per revolution of the handle. If you know R = spring constant, which is N / mm or also kg / mm, you can set up a table and a diagram for pressure per revolution. The diagram shows the weight that the spring presses per revolution of the handle. One should be aware that the pressure falls on the cheese over time, as the cheese "falls" together as the whey is pressed out.
The bottom diagram shows the spring's compressed dimensions in mm as a function of the weight in kg. On picture No. 9, the dimensions L0, Ln and Sn are seen. If the spring is pressed with a force of 32 kg, the spring will move down 7.90 mm. It gives a height between small and large disk of L0-Sn = Ln, 41-7.90 = 33.10 mm |
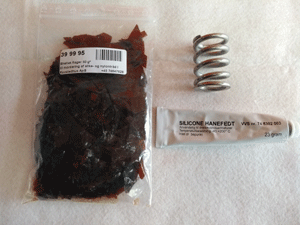 A bag of shellac 50 g flakes are purchased online at Ravsted House. Spring No. 23580 purchased online at Sodemann Industrifjedre A/S. Glidex silicone water tap grease is approved for drinking water. Used here for the threaded rod with handle. Can be purchased from any plumbing dealer or in a construction market.
|
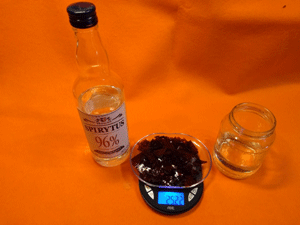 This 96% alcohol is an almost pure alcohol and not denatured. It is used for making homemade liqueurs. Therefore, I have chosen this alcohol as a solvent for shallak flakes. In Denmark, alcohol is subject to an alcohol tax, so it becomes a slightly expensive shellac. But then one can make a liqueur of the rest.
DO NOT use Denatured Alcohol. |
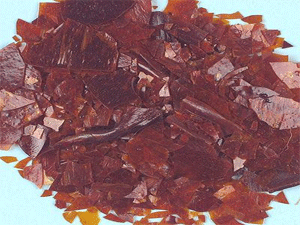 Shellac flakes for the production of non-toxic lacquer for the curd cutter. The bag contains 50 g and costs approx. DDK 80,00. Take 25 g and put the flakes into a tight glass jar. Pour 100 g of 96% fine alcohol - this is what you can drink when making liqueurs. Close the lid tightly and set the glass for a few days. Shake the glass regularly to dissolve the flakes. If necessary, adjust with more fine alcohol or flakes so that you get a suitable thick polish.
|
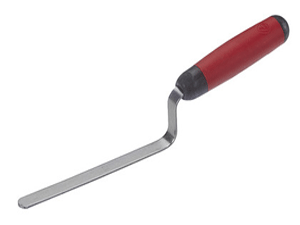 In Harald Nyborg I found this groove spoon for DKK 25.00. If the handle could be separated, it was good otherwise the money was just lost. It succeeded, but forces must be used.
The handle on the lower black ring has a "stop" so that the hand does not slide down. This "stop" is unfortunate, for the purpose as here. I sawed it off and sanded the ring. In addition, it has got a white stripe so that the rounds can be counted. |
|
I have a cheese pot with dimensions ø 260 mm and high 200 mm in stainless steel of 10 liters. However, it is only possible to fill in 8 liters and then make cheese, otherwise it runs over when stirring in the mass. It suits me well, because I always make a portion cheese of 4 liters or 8 liters of milk.
My curd cutter is therefore made to fit the pot. It is seen to the right on picture no. 16. The 2 wooden strips on the sides are 260x20x8 mm and made of hard wood - beech. The round rods are ready-made dowels ø 8 mm also in hardwood. The crossbar (handle) is a residue from the doorstep that I used above for the cheese press. Then I have just one detail - the stainless steel bracket ø 4 mm must keep track of the curd cutter when I run it round in the pot. I use fishing line ø 0.5 mm to cut the soft curd. I have crossed the fishing line crosswise with 20 mm between, so I can cut horizontally and vertically at the same time with the same tool. |
Photo no. 16 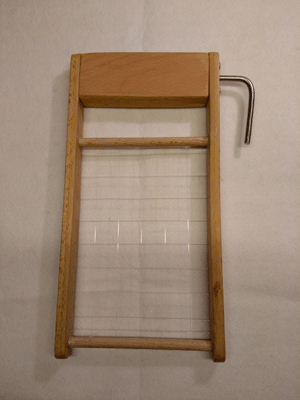
The curd cutter version 1 Works great, but the bracket is not necessary |
The dowels are placed in the wooden frame with a splash of wood glue. The holes are only drilled halfway through the wooden frame and 1 mm holes for the fishing line are drilled before the wooden strips are assembled. The handle is also assembled with a splash of wood glue, but as an extra security the handle gets 4 stainless screws. The handle measures 115x45x20 mm. All parts are sanded with sandpaper before gluing.
The biggest challenge was mounting the wire. I had ø 0.45 mm steel wire for my homemade spinner which I thought could be used. The thread would be ideal if I could just tighten it up, but it can't be done. That's why I used a fishing line, but I don't think it is particularly durable in the long run. We will see. Otherwise, I have to devise another method for version 2. The curd cutter is seen here ready-made, but the non-toxic shellac still has to be applied. It should stand for another week before the flakes are dissolved in the alcohol. Shellak has the E-number E-904, which belongs to surface treatment agents. |
||
|
I have seen a broadcast in TV East from a dairy producing brie cheese from sheep's milk. They use a terminology for the milk through the process. The milk coming in from the sheep is of course called Raw Milk, when the milk is coagulated and cut into small cubes, they are called Cheese Grain. When these cheese grain are sown from the whey and are put in the cheese press they are called curd. Finally, when the cheese is stored, it is of course called Cheese. The type was Brie and the cheese was named after the field where the sheep grazing: "Stenhøjmark Brie". If the broadcast is still on the web, the web address is here. If you want to make cheeses yourself, read Cheese exchange web site.
|
||||
|
On the web I have found weighing cells YZC-1B from 3kg to 50kg. The price is very reasonable and the delivery time for me was 15 days. In addition, I have purchased some HX711 24-bit A/D amplifier to be used for digital reading on an Arduino Uno that I have now purchased, so I will try both circuits. Initially, I am working on a Strain Gaugen (SG) for an analog circuit with my external 0 to +- 15 volt power supply. The diagrams on the right are suggestions for Analog Instrumentation Amplifier for Strain Gauge. The first circuit with 2 x TL082 is made and tested. Works well and is suitable for my purpose with a "Cheese Press". The Wheatstone bridge symbolizes the 50 kg load cell. The amplifier can be used for all Strain Gauge with sensitivity of 1mV/Volt and 2mV/Volt. The gain can be set with P1 and Tara can be set with P2. The readout can be selected either with a voltmeter, where 5 volts is max load, or an amp. meter (here 200µA FSD).
SG is available in many different shapes and with several max loads. I have bought 3 pieces. SG max. 10 kg, SG of max. 20 kg and SG max. 50 kg. The first two provide an output of 2mV/volts at full load. SG 50 kg gives only 1mV/volt. So the amplifier must have an Av of 500 and 1000. Potentiometer P1 regulates the gain in the SG amplifier. The formula for the gain is seen on the diagrams. The displayed setting 20% of 1k Ohm gives Av = 1000 times. The VG of the 50 kg SG amplifier is 5 mV, so Vout becomes 1000 * 5mV = 5.00V. Note Vout can show both plus and minus, it must be plus. Shows Vout minus just changed on the 2 wires to R1 and R2. Normally, green wire is plus and white wire is minus. Another source of error could be that the SG was reversed. The arrow should face down. These SGs are not intended for plus and minus display. The top chart with 2 pcs. TL082 shows the amplifier with load. The bottom diagram is with INA125P, but the amplifier is not yet made. 3 pcs. TL081, 2 pcs. TL082 or 1 pcs. TL084 can be used. Use what you have in the drawer. If you have to buy everything in from new, I will probably recommend INA125P. Image to the right shows the amplifier constructed with 2 pcs. TL082 on breadboard and connected to SG of 50 kg. The cheese press is tightened to the spring and the pressure/weight shows 20.7 kg which can be read on the yellow instrument in the background. The black instrument shows 41.5% of the FSD, which is 50 kg, or equivalent to 20.7 kg. The biggest problem with the amplifier built on a breadboard is RF noise and contact resistance. If I touch some wires and or move the hand over the array, there will be + - fluctuations on the instruments. I have tried to wrap the set in aluminum foil and grounded the aluminum foil. The noise dropped almost 90%, but the wires must not be touched. The next step is to produce a PCB, where Layout must be done with care. Short paths and decoupling capacitors close to the IC. Shields inputs from the output and find a metal box for incorporating the amplifier. |
What happens when a cheese nerd meets an electronics nerd? He asks if he can have a Strain Gauge load cell built into the cheese press. It will then be the next project.
Picture No. 17 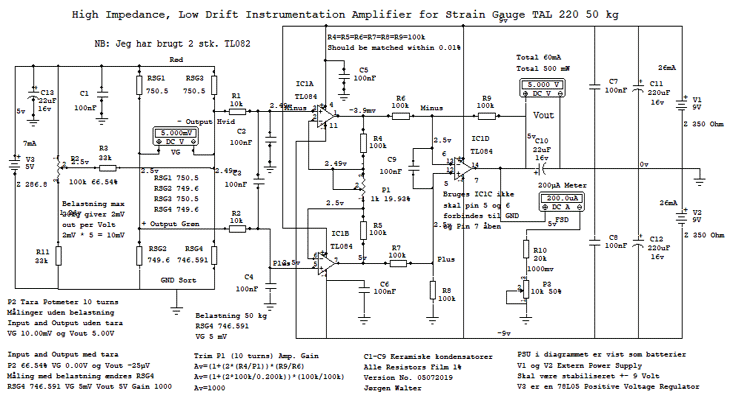
High Impedance, Low drift Instrumentation Amplifier for Strain Gauge 50 kg with 2 x TL082 Instrumentation Amplifier INA125P for Strain Gauge Load Cell Excel Spreadsheet for Spring og Excel Spreadsheet for Strain Gauge Picture No. 17A 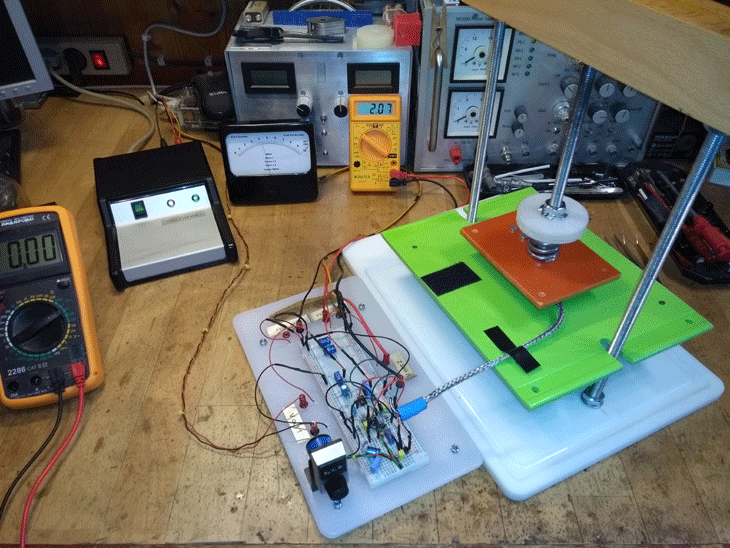
Amplifier with 2 x TL082 built on Breadboard connected to Strain Gauge TAL 220 50 kg |
|
Now PCBs produced, adapted and mounted in a shielded box.
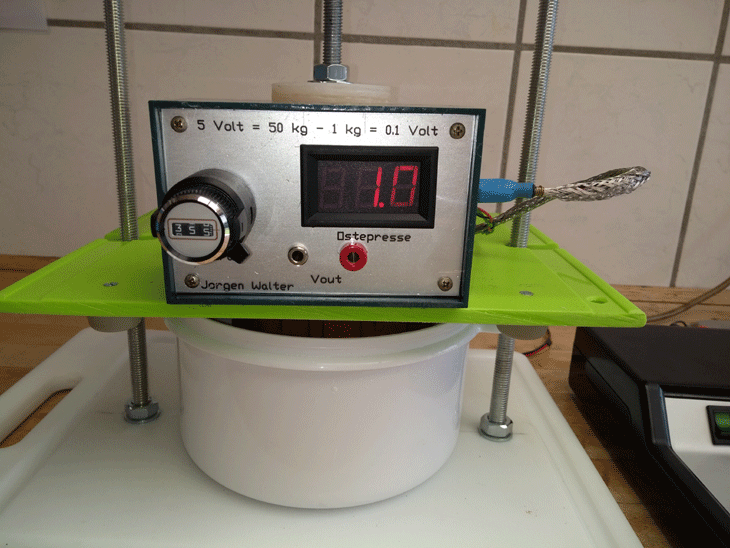
In the drawer I found a Teko Box, which had the right size for electronics, potentiometer and display. The box was not protected from RF noise so that it was lined inside with heavy stanniol which was connected to "front plate" and GND. Now it is a Faraday Cage. The display shows from 0 to 99.9 volts and is supplied with 9V voltage from the plus power supply to the amplifier (4V to 30V). Very cheap instrument purchased online at AlliExpress. Potentiometer P2 for TARA is a 10 turn potentiometer mounted with a 10 times exchange button, so it becomes 100 revolutions for 100k Ohm, or 1k ohms per turn. I'll upload a drawing of the PCB so you can make it yourself. It is very stable and provides a good shield for RF noise. If it is built into a metal box or a plastic box that I have made with a lining of stanniol, it will be even better. The entire setup - amplifier and strain gauge - is temperature dependent. I tested the set-up for 30 hours in my outdoor kitchen, where we had a heat wave. The night temperature was 17°C and the daytime temperature (between 13.00 and 16.00) crept up to 34°C. The lineup was started Friday at 12.00 at 32°C with a weight of 10 kg, which corresponds to Vout of 1.0 volts. Ended Saturday at 18.00 with the same end temperature 32°C. Diagram of measurement results can be seen on sheet SG 50 in Excel Spreadsheet for Strain Gauge. On the bottom picture, the display shows 1.9 volts = 19 kg. The voltmeter shows 1.93 volts = 19.3 kg. The accuracy of the display used is fully sufficient for the purpose of the cheese press. |
Calculation of tara of 50 kg Strain GaugeMy SG TAL 220 50 kg was 100% perfect. There was no difference between RSG1 and RSG3 or RSG2 and RSG4. So, therefore, VG was 0 volts. The diagram on the right shows how with a 100k Ohm potentiometer P2 and a 33k Ohm resistor R6 can generate an extra current in RSG3 / RSG4, so that the difference is equalized. As an option you can insert a potentiometer P1 of 10k Ohm or 1k Ohm, so you get a fine and coarse setting of Tara. |
Picture No. 17C 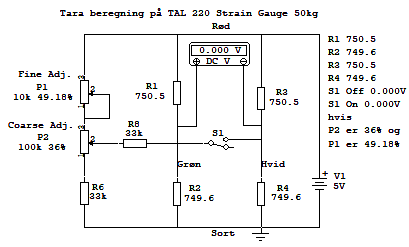
Calculation of tara of 50 kg Strain Gauge Top Image S1 Off - Bottom Image S1 On |
Picture No. 18
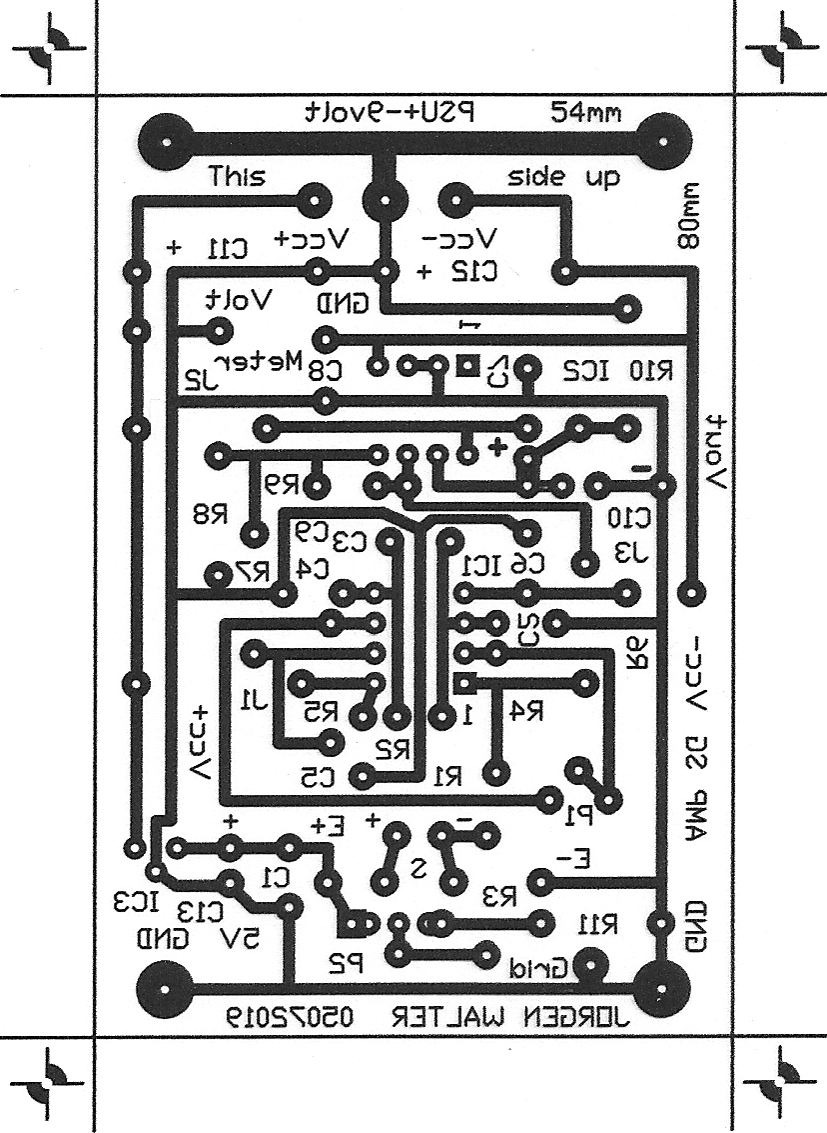
The bottom and top layers to produce double-sided PCB for Strain Gauge |
This double-sided circuit board 54x80 mm is made for an Instrumentation Amplifier for digital readout on a display as described above. My choice was 2 pcs. TL082, since I have many of these in the drawer. The print paths are short and the print is double-sided with GND shielding. 3 Jumper is also on Top Layer. Bottom layer, however, can be used alone if you just remember to mount 3 pcs. Jumper. Many 100nF ceramic decoupling capacitors have been used for RF noise suppression. A few electrolytic capacitors to provide DC stability. 78L05 is a Positive Voltage Regulator that I have selected. It provides 5.0 volts. Across the voltmeter terminals there is a 22µF electrolyte capacitor that dampens fluctuations. All 100k Ohm resistors are selected within 0.01% accuracy. This also applies to R1 10k Ohm and R2 10k Ohm in the input to the amplifier. It is amazing how stable the amplifier works on the print and built into a screened box. The only thing that has a negative impact on the measurements is variations in temperature over time. The weight should be used to measure the pressure on the cheese over time, usually from 6 to 12 hours. Therefore, temperature fluctuations of more than a few degrees should not occur. The digital display DIY Mini Voltmeter I found online at AliExpress. It is supplied with power from the solder terminals Vcc + with the mark "Meter". P1 is a trimmer potentiometer that is soldered to PCB, since the gain must only be adjusted once. P2 is a 10-turn potentiometer which is mounted on the front plate, as it must be set at each new measurement. In addition, I have fitted the potentiometer with a 10 times exchange button to further fine-tune "Tara". Another option is to mount an extra potentiometer of 10k Ohm or 1k Ohm. See above. |
Back to the page where you came from.
General information on ingredients for cheese making
|
Milk is not just milk. Therefore, whole milk is preferred low-pasteurized as opposed to high pasteurized milk. Furthermore, whole milk is organic and unhomogenized to prefer. Moreover, there is a completely different problem. An increasing number of Danish dairy cows produce milk with little ability to coagulate. If you get such a milk, you cannot make cheese. Langmosegård by Tønder delivers Organic Farm Milk at a reasonable price, even if the freight is reasonable. 1 liter of 3.5% whole milk from Thise weighs 1027 g. A carton with screw cap weighs 34 g.
Buttermilk made in the conventional way. The raw milk is cleaned and centrifuged for cream and skim milk. These are mixed again so that the buttermilk achieves a fat percentage of 0.5%. The buttermilk milk is homogenized and then high pasteurized. Cool to the optimum temperature for the lactic acid bacteria now added. The lactic acid bacteria convert the milk sugar into acid, as it is a form of fermentation with oxygen (aerobic) (without oxygen anaerobic alcohol). The buttermilk is cooled to 5 ° C and filled into cartons. 1 liter of 0.5% buttermilk from Thise weighs 994 g. A carton with screw cap weighs 34 g. Kefir More text about kefir coming up. 1 liter of 1.5% kefir from Arla weighs 1011 g. A carton with screw cap weighs 34 g. CHOOZIT MA 4001 is a blend culture of mesophilic bacteria and thermophiles bacteria (Mesophilic and Thermoplic culture), which help with the ripening of the cheese. Mesophilic is a standard lactic acid culture with optimum temperature environment between 30°C and 37°C. Thermoplic is a culture for faster acid production with an optimum temperature environment between 45°C and 55°C. The product can be used for soft as well as hard cheeses. Less quantity for soft cheeses and larger amounts for hard cheeses. From 2.5 DCU to 10 DCU per. 100 liters of milk. The DCU is applied to the package and indicates the amount of culture the package contains and the amount of milk to be used. If the package is marked with 5 DCU, there are also a number of liters of milk, for example 100 liters. The whole package should be used for 100 liters of milk. If you only make cheese of 10 liters of milk, 0.5 DCU is used. A suitable measuring spoon for cheese making can be purchased. Be aware that the culture is lyophilized bacteria that are in hibernation and reside in hermetically sealed special bags. When these are opened, the culture must be taken out with a dry measuring spoon and it must not take place over a pot of steam. The bag is securely closed again and kept closed with solid rubber bands. Put the bag in a plastic bag with a zipper closure. Stands: "Store below 4°C", simply put the bag in the refrigerator. But on some bags it says: "Store at - 16°C" then it must be in the freezer. If a culture from the freezer is to be used, the bag must be taken out 1 hour before use and lie at room temperature. The measured amount is taken out and the bag is returned to the freezer. Flora Danica er en mesofile syrevækker (enkelt kultur). Den har en optimal vækst ved en temperatur mellem 20°C - 25°C, og skal opbevares i fryseren efter pakken er åbnet. Calcium chloride 33 Vol.% solution is added to the milk to optimize coagulation of milk proteins. The cheese becomes more soft inside and the yield becomes larger. If you buy "cheap" everyday milk, it is recommended to add 0.4 ml per 1 liter of milk. Calcium chloride can also be added to the brine to store the cheese (feta cheese) to achieve a suitable lime balance. It is recommended that 4 ml per liter of brine is added. You can even make your Calcium chloride (E-509) solution. To 500 g distilled water add 500 g of pure calcium chloride (CaCL2). It gives a resolution of a volume percent of 32 %. The density is 1.363 g/ml, so 100 ml of CaCL2 weighs 136 g. In my Excel spreadsheet for Calcium Chloride other values can be calculated. Please note that there is a difference between demineralized water and distilled water. Demineralized water may contain bacteria and germs that are not desired in the cheese. One tip: Nonoxal can be purchased cheaply in any food business. It is used for neutralization of oxalic acid in rhubarb and spinach. I have made an analysis of the product with respect to the volume percentage. The density was 1.395 g/ml, so 100 ml of CaCL2 weighs 139 g. I have learned that Nonoxal has added lactic acid, but it does not matter when making cheese? Is there a reader who has experience with Nonoxal? Lysozyme is a natural enzyme recommended for solid cheeses so that they do not swell and form cracks. Normal dosage is 2 g per 100 liters of milk. Dosage is 0.16 g to 8 liters of milk for solid lysozyme or 1.6 ml for liquid lysozyme. Rennet: There are two types of rennet standard animal rennet and vegetarian rennet. I have used both types over time, and I have not noticed any difference, so it is a religious issue that one chooses. However, rennet is a "must", since the whey must be separated from the milk to form dry matter. It's actually called coagulation. The Coagulation effect decreases by 1% per month or 12% per year. Store the rennet in a refrigerator so that it lasts for a long time. Dossing is 2 drops to 1 liter of milk, or 2 ml to 8 liters of milk. Cheese Salt: There are 3 methods of salting cheese: layer salting, dry salting and salting during cheese making. Find the methods yourself online. You can use coarse salt or fine salt. But just remember there must be no added minerals, iodine or anti-caking agents. Kosher Salt, Læsø Sydesalt and French Mediterranean salt are some of the salts that I usually use. Brine: Some cheeses are soaked in a 20% brine for 12 to 24 hours at room temperature. If you want to find the ratio of water to salt, you can use this spreadsheet: Calculation of weight% of a brine. 20% brine provides 250 g of salt per liter of water at 20°C. Or use a brine meter that can be purchased here. Also read: How to make cheese |
Back to the page where you came from.
Recipes for homemade cheeses
Lightly smoked Jalapeno Cheddar Cheese # 1 |
Shopping List |
|
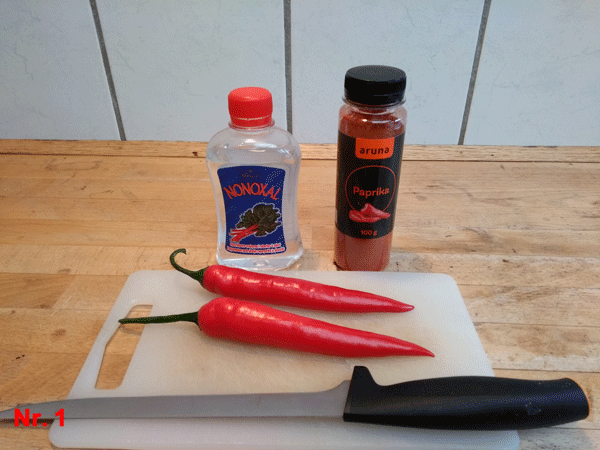
5 liters of whole milk, low pasteurized, unhomogenized, organic 100 ml Boiling water from Chile (32°C) 0.5 g Danisco Mesophilic CHOOZIT MA 4001 starter culture 2 ml Calcium chloride 33 % mixed with 5 ml cold water 1 ml Lysozyme an enzyme mixed with 5 ml cold water 1 ml of 8 drops of rennet mixed with 5 ml of cold water 1 tbsp. Læsø Syde Salt or Kosheralt. Salt without iodine 4 pcs. Red Jalapeno Chili pepper finely chopped without grains 1 tbsp. Sweet paprika. Gives the cheese a reddish color Note: The number of chili is matched with your taste for chili If the cheese is to be smoked is up to you Maturation for the first 2 weeks at 12-20°C. Fermentation storage The next 2 weeks at 8 - 12°C. Maturation storage Then in a refrigerator in wax paper No. 1 Jalapeno Chile Prepared. I didn't use Nonoxal No. 2 Jalapeno Chili is dried in the oven No. 3 The milk is poured into the pot No. 4 The milk is hot 32 ° C. Acid range must be sprinkled No. 5 The 3 "chemilalies" used. Rennet not shown No. 6 The curd rest 1 hour. 14.2 is volt for Pump and Fan No. 7 The starter culture must be closed airtight with clips No. 8 The curd is cut and turned into cheese grains No. 9 The cheese grains is put under pressure No. 10 The finished non-smoked cheese weighs 607 g No. 11 The finished smoked cheese weighs 551 g No. 12 The cheese has matured for one month No. 13 Jalapeno Chili Cheese # 2 digital reading of * weight No. 14 Jalapeno Chili Cheese # 2 pressed with 10 kg No. 15 Jalapeno Chili Cheese # 2 1/4 piece cut out |
Lightly smoked Jalapeno Cheddar Cheese March 6, 2019
This free script provided by JavaScript Kit 5 liters of milk gives 607 g or 11.8% before smoking. After smoking 551 g or 10.7% (wt%) * Weight: Digital display goes from 0 to 99 kg. Ex. 0.1 = 1 kg and 1.0 = 10 kg, etc. Jalapeno cheese # 2 is made as # 1 but only pressed with 10kg and therefore more soft. Weighs after smoking 945 g or 18.6% (wt%) |
|
Procedure without liability: Prepare the chili fruits. Sprinkle the fruit longitudinally and free it from grains and ribs. The four halves, grains and ribs are boiled in 200 ml of water for 5 minutes. Pick up the 4 halves of the fruit and cut them into very small pieces. Put the pieces in the oven and dry them until crisp, with warm air at 100°C. Put sweet paprika in the boiling water and cook for 2 minutes. Say the water through a coffee filter. There must be approx. 50 ml of boiling water. Pour the mixture into the milk.
A Heat the milk to 32°C, sprinkel starter culture on the surface, wait 10 minutes and stir. Put calcium chloride and enzyme in the pot and stir for 10 minutes. Let the milk rest in the pot at 32°C for 1 hour. B Come rennet in the pot and stir - also stir up and down. It must not be done more than 60 seconds, because now the milk begins to coagulate. The pot should be kept at rest for the next hour so that the whey can be separated and the curd becomes firm. The temperature must still be 32°C. C Now try if a "Clean cut" can be made in the curd. If not, wait 10 minutes. The curd is cut into small pieces with the curd cutter - shown above - otherwise with a suitable knife. The vertical cuts are easy enough with a knife, but the horizontal cuts are a bit cumbersome. Stir in the curd, which now consists of whey and cheese grains. Let the mixture rest for 15 minutes so the cheeses grains settle on the bottom of the pot. D Remove some whey from the pot with a cup so that the whey just covers the cheese grains. Heat the pot to 39°C and let the pot rest for 15 minutes at this temperature. Then stir in the pot and bring the cheese grains into a sieve lined with a cheesecloth. Drain the cheese grains for a few minutes and return to the pot. Put salt and the dried chilli in. Massage well and thoroughly cheese grains, salt and chili together with clean finger. E Come cheese grains into a cheese mold lined with cheesecloth. Place the cheese mold under the cheese press - see picture no. 5 - pressure with 10 kg for 1 hour. Turn cheese over and press again for 1 hour. Then turn the cheese and press with 22 kg for 12 hours. The cheese is removed from the cheese mold and placed at 18°C for 2 days. Remember to turn the cheese a couple of times along the day. It is now up to you to decide whether the cheese should be smoked or simply be ripened. I have a smoke oven that can cold smoke, so I will try to smoke the cheese quite easily. The cheese has been lying a couple of days for drying, and is now placed in the smoke oven, where it is smoked cold over beech mud overnight. The finished cheese before smoking weighs 607 grams. After smoking 551 g. Smoked cheese. Postscript: The cheese was tasted after 1 month of ripening: The cheese is very hard, dry and grainy in the taste. To the salted side, but not to salt. The Jalapeno Chili Peppers that I used were obviously not quite strong, because one should look long for the taste of chili. You can compare the cheese with a hard parmesan cheese which you tear over the food. A perfect smoke flavor can only be recommended. Next time I will cut the curd in slightly larger cubes, press the cheese a little less (5 kg) and find some stronger chili peppers - maybe 4 pieces, and only 1 tbsp. salt. The cheese is definitely worth doing again. I have done so, 4 strong chili peppers and pressed up to 10 kg for 12 hours and less salt. Perfect! but a little more chili flavor I could use well. I think the "Hot" loses on cooking? |
Back to the page where you came from.
Slightly matured Gouda Cheese with Ginger # 2 |
Shopping List |
|
5 liters of whole milk, low pasteurized, unhomogenized, organic 0.5 liter Kefir 100 ml Boil water from Ginger (32 ° C) 0.5 g Danisco Mesophilic CHOOZIT MA 4001 Acid Rack 2 ml Calcium chloride 33% mixed with 5 ml cold water 1 ml of lysozyme an enzyme mixed with 5 ml of cold water 1 ml = 8 drops of rennet mixed with 5 ml of cold water 2 tbsp. Læsø Syde Salt or Kosheralt. Salt without iodine 50 g Fresh ginger. Peeled and finely chopped 1 tsp. Turmeric. Gives the cheese a yellowish color Note: I used a little kefir for this recipe,
to get some healthy and good lactic acid bacteria into the cheese. 1 liter of 3.5% whole milk from Thise weighs 1027 grams 1 liter of 1.5% kefir from Arla weighs 1011 grams 1 liter of 0.5% buttermilk from Thise weighs 994 gram I have not used ginger cubes in the cheese, only decoction. If you are going to use "fresh-fruit" in a cheese, you will probably have to dry the fruit a lot before it gets into the curd. I wait and see what happens to the Jalapeno Cheddar cheese above. Try to see this recipe for Gouda cheese with 19 liters of milk. |
Slightly matured Gouda Cheese with Ginger 27. marts 2019 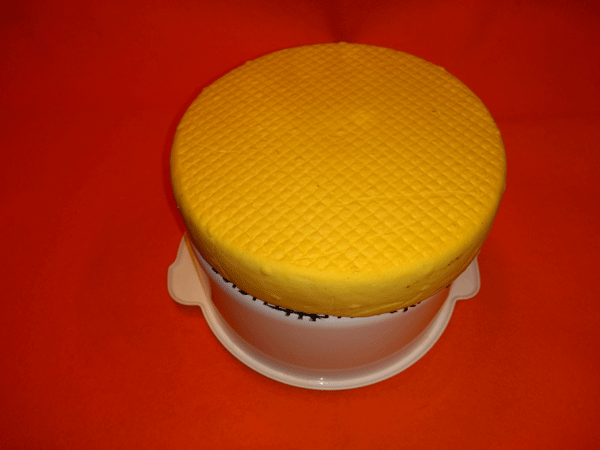
5.5 liters of milk gives 750 g 13.3% of cheese after pressing. After drying and maturing 662 grams 11.7% |
|
Procedure without liability: Prepare the ginger. Peel the ginger and cut it into small cubes. Getting the cubes into the pot, pour 300 ml of water and boil them for 10 minutes. Put the turmeric in the boiling water and cook for 2 minutes. Say the water through a coffee filter. There must be approx. 100 ml of boiling water. Pour the mixture into the milk.
A Heat the milk to 32°C, sprinkel starter culture on the surface, wait 10 minutes and stir. Put calcium chloride and enzyme in the pot and stir for 10 minutes. Let the milk rest in the pot at 32°C for 1 hour. B Come rennet in the pot and stir - also stir up and down. It must not be done more than 60 seconds, because now the milk begins to coagulate. The pot should be kept at rest for the next hour so that the whey can be separated and the curd becomes firm. The temperature must still be 32°C. C Now try if a "Clean cut" can be made in the curd. If not, wait 10 minutes. The curd is cut into small pieces with the curd cutter - shown above - otherwise with a suitable knife. The vertical cuts are easy enough with a knife, but the horizontal cuts are a bit cumbersome. Stir in the curd, which now consists of whey and cheese grains. Let the mixture rest for 15 minutes so the cheeses grains settle on the bottom of the pot. D Remove some whey from the pot with a cup so that the whey just covers the cheese grains. Heat the pot to 39°C. Stir salt into a couple of cups of whey and put it up in the pot and stir. Let the pot rest for 15 minutes at this temperature. Bring the cheeses into a sieve lined with a cheesecloth. Drain the cheeses for a few minutes and proceed to the next point. E Getting cheese grains into a cheese mold lined with a cheesecloth. Put the cheese mold under the cheese press - see picture no. 5 - pressure with 1 kg for 1 hour. Turn the cheese over and press again with 1 kg for 1 hour. Then turn the cheese and press with 10 kg for 12 hours. The cheese is removed from the mold and placed at 18°C for 2 days. Remember to turn the cheese a couple of times along the way. The finished cheese after pressing weighs 750 grams 13.3%. After drying and maturing 662 grams 11.7%. Postscript: The cheese got a fantastic form and good looks, but there was something missing in taste. |
Back to the page where you came from.
Smoke cheese with caraway # 3 |
Shopping List |
|
4 liters Whole milk, low-pasteurized, homogenized, organic 0.5 liters of buttermilk made in the conventional way 0.5 g Danisco Mesophilic CHOOZIT MA 4001 Acid Alcohol 2 ml Calcium Chloride 33% mixed with 5 ml cold water 1 ml of Lysozyme an enzyme mixed with 5 ml of cold water 1 ml of 8 drops of Cheese run mixed with 5 ml of cold water 2 tbsp. Læsø Syde Salt or Kosher salt. Salt without Iodine 2 to 3 tbsp. caraway. To your taste 1 liter of 3.5% whole milk from Thise weighs 1027 grams
1 liter of 0.5% buttermilk from Thise weighs 994 gram Note: The top image shows the smoking cheese from the recipe here, which is ready for the smoke oven. The bottom image shows a smoking cheese from another recipe. It is just included to show the strainer I use in the smoke oven when smoking the cheese. Salt can also be added with the caraway. |
Smoked cheese with caraway September 19, 2019 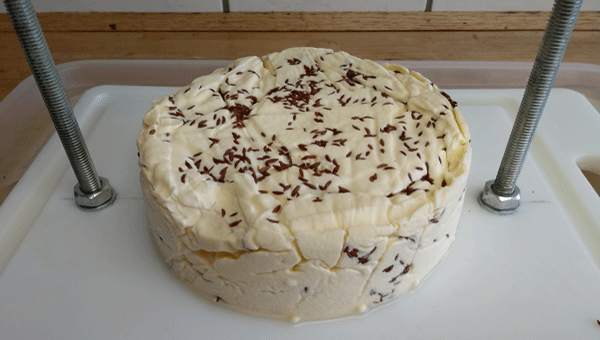
4.5 liters of milk gives 880 g of smoked cheese after pressing and smoking |
|
Procedure without liability:
A Heat the milk to 32 ° C, bring acid to the surface, wait 10 minutes and stir. Put calcium chloride and enzyme in the pot and stir for 5 minutes. Let the milk rest in the pot at 32 ° C for 1 hour. B Get rennet in the pot and stir up and down as well. It must not be done for more than 30 seconds, because now the milk starts to clot. The pot should be kept still for the next hour so that the whey can be separated and the curd solid. The temperature should still be 32 ° C. C Now try to make a "Clean Cut" in the curd. If not then wait 30 minutes. The curd is cut into small pieces with the curd cut - shown above - otherwise with a suitable knife. The vertical cuts are easy enough with a knife, but the horizontal cuts are a bit cumbersome. Stir in the curd, which now consists of whey and cheese teas. D Remove some whey from the pot with a cup so that the whey will just cover the cheese teas. Stir salt into a few cups of the whey and stir it up in the pot and stir. Let the pot rest for 15 minutes at 32 ° C. Put the cheese teas in a sieve lined with a cheesecloth. Drain the cheese teas for a few minutes and proceed to the next point. E The cheese eaters came up in a cheese mold lined with cheese linen. Mix the grains in the cheese teas. Put the cheese mold under the cheese press - see picture # 5 - press with 10 kg for 1 hour. Turn the cheese and strain again with 10 kg for 1 hour. The cheese is taken out of the cheese mold and placed in a suitable sieve which can be hung in the smoke oven. The finished cheese after pressing and smoking weighs 880 grams. It gives a weight utilization of 21.2%. It is possible to adjust the hardness of the cheese by pressing more or less, as well as for how long the cheese is pressed. I hit right after my taste, the cheese can be cut and put on the bread, but still a little soft. You can see that the cheese has some cracks on the side. That's because I cut the cheese in the whey with a knife, it gives large pieces that do not gather completely during pressing. Maybe the cheese canvas has also contributed to folds? Well! when it is a smoked cheese it is eaten within a week. For a stock cheese, these cracks may not be there. Postscript: The shape and appearance of the cheese is a bit lacking, but the taste has nothing to do with it. I'll just use my curd slice next time instead of a knife. That's why I made it. |
Back to the page where you came from.

one.com |
